Archive for the Category »Recipes «

Apple Cake Balls

End of the school year is here!  My kiddo is going to officially be a 3rd grader!  My heart cries no, this happened way to fast for me!

IMG 0040 e1306446023914 200x300 Apple Cake BallsOk so I had to go out with a bang for her class treat.  As you know if you have read past blogs. I love the cute food. and since I discovered how fun it is to make cake balls, I make them for any occation that I can. I of course am totally inspired by the book Cake Pops, by Bakerella. Her designs are cute and all but you can also get the info online. So though her book is fresh spin it is not something no one has previously done. She just does is SO well icon smile Apple Cake Balls

So I decorated my own version and made into apples for my little kiddo’s last day.  See previous post for how to make cake balls.

As for decoration I used  Wilton Red melting candy (tastes chocolaty yummy), sprinkle shape leaves bought at craft store durring the fall, red sugar sprinkle for some sparkle (who dones not like that) and pretzle sticks for the apple stem. The inside I decided to use strawberry cake mix and strawberry icing.  Yea I should have used apple flavored cake. But, I had this in stock and used it…Plus they are all 8yr olds. They will be happy just to get the treat…

Side note the kiddos loved them! Should have made more to pass out extras to the office ladies.  Oopps ;P

Momma Says: Wishing these were the ones that would be good once a day to keep the Doctor away. Oh well at least the chocolate can keep you mentally stable.

IMG 0041 e1306445965586 287x300 Apple Cake Balls


Recipe: Loaded Roasted Potatoes/ Comfort food

There is always that one dish. The one that either transports you back to a kid, eating Grandmas special cake. Maybe it is something your Momma made you every time you felt sick.  That is comfort food.

Comfort food is usually not best for ya. Sometimes you just need that something when life gets you down. It can truly be a pick me up. Something on that rainy day. Even that one late night snack that hits the spot just right.

I have fond memories of my Grandma giving me Celestial Seasonings, Sleepy time tea with honey. She would make me a nice warm cupful when I would spend the night. To this day when I make a cupful at night I think of her.

As a child I was kind of a picky eater and would have to sit and eat  all on my plate. As I got older I have memories of many meals where I would not eat the meat and my cousin and I would just eat the potatoes. That must be where my love of all that is potato began. Since I am so weird with meat, potatoes are always safe and yummy. 

IMG 0371 300x200 Recipe: Loaded Roasted Potatoes/ Comfort foodOne of those comfort foods for me is for sure potatos. God help me I just love me potatoes!!!! I especially love roasted potatoes. Day old even.  If you smother them with goodies that is even better.

Lucky for me I had some leftover steak that was cooked after marinading in my Uncle’s Jack Daniel sauce. Sorry folks I will not be sharing that family recipe as death would probably come swiftly for me.  But, I will give you the tried and true recipe for my ultimate comfort food Loaded Roasted Potatoes. It is so easy. It is so yummy. Darn there is never any leftovers. Because, I cannot help myself as I make a nice size portion for me and reluctantly share the rest with the family.

I used to be intimated by roasting vegetables. Don’t know the exact reason. But, one thing I learned is potatoes need more than you would think of salt. For some reason it just is not right without enough. In the beginning I found the easiest way to roasting potatoes.  I started out with was just using Lipton Onion soup mix with olive oil.  But as I tried to move away from packaged foods I eventually went for it and actually used spices on my own and roasted potatoes. They were a hit still. So no more packaged mixes there. Free from all the chemical additives. I know they taste good. I just have such eating remorse afterwards. It is better all around to do it from scratch.

Loaded Roasted Potatoes

8 – 1o med sized Yukon Gold potatoes

1 tsp salt

ground black pepper (approx 1/4 tsp)

1/2 tsp garlic powder

1/2 tsp onion powder

1 Tbl Italian seasoning

1/4 cup olive oil

shredded cheese

diced green onion

sour cream (Horizon is the BEST)

leftover finely chopped up steak or cooked crumbled bacon

Preheat oven to 425

1. After washing potatoes. Dry them before chopping.  Cut the potato into half and chop into small 1/2 inch pcs. Try to keep them as close to the same size as you can to ensure even cooking.

2.  Toss potato chunks in the spices. Then add olive oil.

3. sprinkle a little oil on cooking sheet pan and spread it around. Dump potato mix onto sheet.

4. Cook for approx. 30 min. Turn down temp 350

5. sprinkle with shredded cheese and chopped up meat. Return to oven just until cheese is melted.

6. Remove from oven plate portions and dollop with sour cream then sprinkle with green onion.

7. ENJOY!!

Momma Says:  Potatoes are perfect food, it can be mashed, baked, fried, boiled and roasted. (and adored as I do) It is no wonder on average we each eat 73lbs per year! ( from wikI)

Recipe: Colored Egg Sheets for Spring Chick Bento

IMG 0036 300x200 Recipe: Colored Egg Sheets for Spring Chick Bento

 I allways wondered how people were making eggs and cutting them into shapes or using them to wrap other food into.  the possibilites are boundless of the types of bento you can create! So after several attempts on my own I searched out the perfect recipe so my bentos can even get more complex for me in the morning, LOL!

I found basic recipe in one of my new books, but after looking on the web alot of people strain the beaten egg, that way you dont get the white patches in the egg like I did. Darn that is a good thing to know, but whatever.  I am not using these sheets to wrap up, just to use my cookie cutters into and make some cutie Spring cut outs!

I made so many at once because egg freezes well. Also cooked egg can keep for a week in the fridge! So I cut and cut and planned out many bento designs.  I then layed each design onto plastic wrap (cooled egg of course) wrapped them up and put the “packets” of designs into a freezer bag for later use! I froze them and kept some in the fridge. 

The colors I used were from a natural vegetable dye not the  normal store bought food coloring. That is why my pink (tried for red) and blue are very pastel.  Since I seperated the egg white from the yoke, the remaining yokes I cooked to make a wonderful yellow. I used a whole egg plus the “red” natural dye to make the brown color egg sheet. I so want to use my regular food coloring, but I have Mommy guilt cause I really want to use organic foods for my kiddos. Plus I hear how red food coloring is bad for health of kiddos especially ones with any focusing issues. AARRGGH!  http://articles.mercola.com/sites/articles/archive/2011/02/24/are-you-or-your-family-eating-toxic-food-dyes.aspxhttp://wiki.answers.com/Q/Is_red_food_coloring_bad_for_you also check out  if I havent scared you enough check out this one http://www.amug.org/~jbpratt/recipes/allergiesintol/blproblems.html

Recipe for egg sheets from  http://www.justhungry.com/2003/12/japanese_basics_1.html I personally omitted the sugar she uses and also used egg whites for the colored sheets.

IMG 0037 300x200 Recipe: Colored Egg Sheets for Spring Chick Bento

So here is my Spring  Chick Bento!  She is on top of some GF Pizza left overs.

I also used my cutouts for the cucumber flowers, cherry tomato with leaf pick, egg and veg crustless quiche and turkey flower with pea pod leaves.

Momma Says:

More Kids Bento!!

Hello my name is Julie and I am bento addict.

OK I officially have become an addict.  The definition of addiction is –noun the state of being enslaved to a habit or practice or to something that is psychologically or physically habit-forming. There you have it.  Bento is habit forming. I get up early usually to to it before everyone wakes up. Sometimes I even do it before bed, so it is ready the next day. I am constantly trying to find info on the Internet about it. I cannot go into a store without thinking about it. I could not even escape the desire when I was at the library, that was a sad day cause I DID NOT find anything for my fix….

OK now the I have admitted my new obsession. I took some pictures of my latest creations. Lucky for me my little kiddo has some holidays lining up so I can make cute bentos for her.  I like to surprise her with her bento’s so that is why I do them late at night or early morning. Then after school the first thing was “OK, how was lunch today”? Then she proceeds to tell me what kind of bento she had. 

IMG 0096 300x200 More Kids Bento!!She is going to freak out today, I combined not only Pokemon for her bento but tried to add some clover and rainbow to it. So it also kinda worked for St. Patty’s day. I thought of doing the whole rainbow because we don’t usually celebrate St. Patty’s day. Something about corned beef that scares me to my soul. So I tried to use some “Wilton edible markers” to draw the Pokemon and a rainbow on some white cheese and some clovers on the ends of cut carrots. These markers will be in for review for a later post cause they STINK!  Besides the edible marker fiasco the kiddo will not complain cause I think she will love it!  Also included in bento is rice-balls (onigiri look under my recipes) and egg and sausage flowers, TOO CUTE!

Shout out to Auntie Kendra for turning me onto rainbow cupcakes!

There is some awesome inspiration out there if you google bento. So like I have said try it out, even make more adult bento for yourself. You will see that by portion control and use of healthier food you can do yourself and your waistline some good!

IMG 0016 300x200 More Kids Bento!!

My bento for Valentines Day with heart shaped strawberries. Their natural shape sure helped add some easy hearts to this bento. This bento box is a two tier bento. I got it in an Asian Market in Denver.

Note to that I first went to a very traditional store, that is where I found this one and paid like 7 bucks.

When I went to the second Asian Market in a more downtown on main street it was selling over double in price!!!

IMG 0019 300x200 More Kids Bento!!

I am so glad I choose to check out the more off beaten path store first.

So if looking for an Asian market let this shopping lesson of mine be your guide! Look up a few and check them out starting at the furthest from main street. The prices are allways better!

 Go to the one first where it is not in center of town by tourist sites!

 Can you say tourist trap?

IMG 0020 e1300382236126 300x244 More Kids Bento!!I like it allot it is cute and pink too!  So even though it is smaller you get double

space. I like it because you can split up the food as I did. Fruit and veg on top and meat (mini tacos used) on the bottom.

See the little cute panda pick sticking out! He doubles as an eating utensil…

Special note here if your kiddo is under 5 I probilby would omit using little pics due to choking hazzard. The pics are cute but not for tiny kiddos, come on now. You already new that, right?

IMG 0004 300x200 More Kids Bento!!This next one is in a sandwich box that you can pretty much purchase anywhere. I have seen them even in the local supermarket. They work great for the traditional sandwich but even nicer for bento! 

This bento I used leftover veggie crustless quiche (fratatta?). My little kiddo once again was fooled into eating veggies because I had her make her own quiche that day and she added  vegtables from an assortment offered to her and some leftover chicken from the previous night.

Since SHE made the quiche she said it was the best quiche she ever ate!  Love it.. (I even used quail eggs for the mice and slice of cheese cut into a cat face)

My no fail quiche recipe

 3 eggs

1 Cup liquid, either whole milk, half and half, whatever, I have even used cream of chicken soup!

1/2 to 1 Cup shredded cheese ( I like to use Italian mix that is already packaged)

salt and pepper

Whatever you like to use also, from chicken to vegetables (even canned and drained work), defrosted frozen spinach, cooked bacon or sausage.  Use what you have.

1 Tablespoon of Bisquick or flour ( I use gluten free Bisquick cause it is always on hand and has a great blend for GF)

Crust (GF) or no crust just grease pan.

350 degrees and cook for 30 – 45 min.

 Watch it so it does not burn. I wait until it is just set and not Jiggly in the middle. Cool and eat!

IMG 0056 300x200 More Kids Bento!!The next few bentos I really went crazy cause I got some cute animal food separators and I wanted to try to fill in the gaps more in the bento box like I see alot of experienced bento artists do.

 So I used allot of color and tried to very the textures of the fruit and veg by cutting in different shapes.

This is the day before St. Patty’s so the sprouts were clover sprouts that she picked out at the market. (She loves anything bunnies so to eat clover anything like her bunny used to is a biggie for my kiddo)

IMG 0086 e1300384486296 200x300 More Kids Bento!!My new found treasure is a bunny egg mold I broke down and bought one online cause when I saw it I just new my little kiddo would loose it. She is a bunny lover all the way. Egg molds are easy to use but one word of advice you have to buy the smaller eggs do not use boiled large or xtra large cause they wont fit into the mold. Once you boil and peel egg put warm egg into shaper and lock it then just wait for it to cool. Then once cooled pop it open to find your little cutie egg! I cannot wait for her Easter bento!!!

I again filled in allot of the void space and used cutters to cut meat and cheese stars and used a cute pick for the bunnies bow. The key is a little variety of taste and textures.  So if your only using a slice of apple save the rest for the next days bento. It is ok to use just a few pieces of this and that. This is hard to get over as “American” eating we want to put alot or use the whole thing!

 Try to resist and get a good balance of many different kind of foods. No need to over eat here!

Momma Says : Nothing would be more tiresome than eating and drinking if God had not made them a pleasure as well as a necessity.  ~Voltaire (SO VERY TRUE!!)

Homemade Cereal Breakfast Bar Gluten Free Too!

gluten free 300x211 Homemade Cereal Breakfast Bar Gluten Free Too!My little one is on a gluten free diet . We believe she is better gluten free, as we think she might have a “intolerance”. We think this due to the fact if she eats say spaghetti and meatballs (both containing gluten from the wheat) and garlic bread, she gets tummy pains. We notice this at a very young age. Never really put two and two together then. It just seemed like she always had a stomach ache and sniffles. We used to endearingly call her “sniffs”. Plus she as she got older she started to have focusing issues in school. We tried every holistic tummy meds not much really worked. We chalked everything up to her being a preemie baby and thought it was something she might grow out of.  We don’t have any allergies in our family, or people with stomach problems, so it seemed to us it was a preemie thing. 

Then one day I was shopping and a woman was buying a TON of corn starch.  Being the nosey person when I think some Mom is going to do something cool, I asked “why are you buying so much? Some sort of craft thing with the kiddo’s ?” I said with a big smile.  She then said a story that was like a light bulb turned on in my head and I was  standing there with a  DUH look on my face.

She told me how her son had a  “gluten intollerance” think of it kinda like an allergy (though a true allergy is a whole different thing entirely with you histimine levels and such, an intolerance is more on the lines of when you have overly strong antibodies reacting to the proteins in gluten kinda  to Celiacs disease).. That his body when it processes wheat products the gluten gives him a stomach ache and sniffles. She also told me it effects his brain so that he does not focus well in school.  I was like WHAT you are like talking about my little one to a “T”!  Thus began a nice conversation with a woman I lost a phone number to (just my luck). That day is when I started my little ones diet to be gluten free. The results have been the same as her son,  just wish I heard of this sooner. There is allot on the Internet on this subject so check it out and consult your family doctor before trying anything.

Now that I am knee deep into the gluten free lifestyle for my little one, I do find it hard to find some of the things she loves the best in GF that do not have an off texture or taste. So put that on a little kiddo and they’re like”what is this, YUCK”!  I found through trial and errors some good things. But one of my daughter’s favorite things are cereal bars and granola fruit bars. Both of which she cannot bear to eat the GF versions. So I set out to make a pleasing GF cereal bar for her to have as a snack at school.

There are millions of different recipes on the Internet for cereal or granola bars.  I just needed to get the idea of binders. How were people sticking all the yummy goodness together? Yea, I guess I could use GF marshmallows aka rice crispy treat but that is not what I was looking to make I want something like the store brand I also don’t want tons of sugar or highly precessed ingredients. So I decided I would try organic honey, organic Agave nectar and organic peanut butter combination to be my experimental binders and  a couple of her favorite GF cereals then hope for the best.  One thing to remember when making gluten free check labels and beware of oats they are not gluten free unless specifically stated and grown specifically to be GF. So be cautious and buy from a reputable company making GF items.

Recipe for Brynnies GF Cereal Bars:

1/2 Cup organic honey

1/4 Cup organic blue agave nectar

1/2 heaping Cup of organic Peanut butter

1 Tablespoon butter

1 teaspoon vanilla extract

4 Cups of combination of favorite cereals mixed

(I used 1 cup corn chex, 1c rice chex, 1 cup berry Kix, 1 cup regular kix cereals all GF)

IMG 0011 e1299981792748 200x300 Homemade Cereal Breakfast Bar Gluten Free Too!Directions:

I put the honey, agave, peanut butter, butter and vanilla into the microwave 30 sec. intervals until smooth and incorporated.

I then mixed the wet syrup with the 4 different cereals.

* (at this point I went for the dried fruit in the cupboard but found I was out icon sad Homemade Cereal Breakfast Bar Gluten Free Too! – dried cherries would have been so yummy! you can add whatever your kiddo loves like chocolate mini chips, dried fruit, sunflower seeds be creative with their favorite things)

Placed all items into a prepaird baking dish and smushed down as much as I could to get it compacted like a granola bar.

I then placed it into a 350 degree oven and baked it about 18 minutes, be careful to not burn it.

I let it cool in pan on the counter then placed it into the fridge to really stiffen up.  Cut it into bars

I was ready to give her one to taste as we walked out the door even gave my teenager one

IMG 0014 300x200 Homemade Cereal Breakfast Bar Gluten Free Too!She loved it! I also had to taste test it. Yummy and not overly sweet!  So many recipes have tons of extra added sugars and brown sugars along with binders like corn syrup, maple syrup or honey. The list goes on. I was so happy I did not add the xtra sugars that allot do. 

Bonus the picky teen ate it up without a EWWW I am not eating GF junk!  So it was a hit!

IMG 0018 300x200 Homemade Cereal Breakfast Bar Gluten Free Too!The only thing I would definitely do is add the dried fruit for the extra chewiness. These bars are crunchy and chewy but the fruit would have brought it right up there  to compete with the store bought preservative high sugary ones and blown them out of the water. Ohhh maybe some chocolate drizzle next time oh yea I want to keep it healthy. But they say chocolate is good for ya? Yes I will go with that one next time. Sometimes you gotta be a little bad….  icon wink Homemade Cereal Breakfast Bar Gluten Free Too!


Momma Says: Crunchy, chewy an O so yummy. Make them up with your favorite things. You will never buy store bought again!

Cake Pops Not Just For Holidays

pops Cake Pops Not Just For HolidaysI got a book thought I would try the recipes for Cake Pops as writer Bakerella calls them. They are also called cake balls for everyone else who has made them. What I liked about bakerella’s “Pops” was it is a new spin on an old idea. She has very creative ideas for the cake balls and the photos and illistration of how to steps are easy to follow.  Kids will love the ideas she dreams up in this book.

What are cake balls?  Think of a doughnut hole on a stick. Though you dont have to make them on a stick, but why not? it makes it so much fun to eat it that way.  Who does not love any kind of food on a stick?  My kids would eat their veggies better if on a stick so why not dessert.

I am definatly going to try some of these ideas not just for the holidays but as a fun suprise for after school I think would be so fun.

With Valentines class fun coming up I really wanted to make something fun with my little one to pass out with her valentines at the IMG 0502 300x200 Cake Pops Not Just For Holidaysclass party. Though the book has so many cute animal faces and such my mind was realing with the fun of decorating my daughter would have. So 2 weeks in advance I made the cake cut it into fourths and froze it to save until the use the day of making the pops. Purchased all the little valentine type of sprinkles and things. I thought the little bear or a piggy with heart for a nose in pink candy coating. My spin on her idea. Then the weekend of where I was susposta start to get these little cutie pops together came and I was still getting over a cold (going on 2 weeks) so my creative juices were not exactly flowing.  I was not even sure my little one who now was complaining she was not feeling good would even make it to school on Monday.  So as she lay in front of the TV I sanitized the heck out of myself and with mask and gloves all on to make sure no germs spread to these little yum balls, we got it together at the table and started. Problem Iam not full of the energy required for all the little faces of Valentine piggies I had dreamed of making and the effort  needed to be creative was not there.  I decided to opt out of the animal pops and just decorate with different sprinkles. That way she can still help and she can still have a cool treat for class.

IMG 0488 e1299168145897 300x196 Cake Pops Not Just For HolidaysThe first thing you need to do is make the cake and have it cooled. Since I made mine a little over a week prior I just defrosted it. Then you crumble the cake into tiny crumbs.  When the crumbs are nice you add 1/2 to 2/3 of a can of frosting. Many websites and the book use this amount.  I softened mine for a few seconds in the microwave since I had mine in the fridge. Then you fold the frosting into the crumbs. I like the texture of still looking like some sort of cake is inside so 1/2 jar was used and that was plenty it held together great. If you use more frosting it makes them more texture of a truffle. Why not just make truffles then?  What ever you like do..

Next you make the balls. I used a small cookie scooper. That way the balls were all consistant in sizes. With a little roll in the hands to help shape (kiddos will have fun here) you place them on a cookie sheet lined with parchment and freeze for 15 min. While that is happening you can melt the candy (chocolate) coating.

I bought two different types the big brick type from local food store and Wilton brand. I must admit the coating on the Wilton brand seemed just as good if not better. Plus you can get a variety of colors where as the brick you just have white or cocoa colors. I do not want to mess with food color paste unless I have to so just get the Wilton brand if you need a color.

If you go for the Pops like Bakerella, you need to dip the lollipop stick (found at craft stores) in a little of the coating then insert into balls or omit that step all together and just pop them into the coating. Do this step a quickly and dont coat too heavy or they might fall off the stick.  I used two forks to swirl the balls around in the coating let the coating drip off a little then set them on parchment. Once you dip in the coating get ready to add your decorations if your just going to do sprinkles cause the coating will harden and then duh they wont stick on.  If your going to actually do faces and such I suggest Bakerellas book to see how she sets it all up. I on the other hand was taking the easier way out and after wards would just put the pops and balls into cute little liners.

The end result was just as cute and they looked like yummy bon bons. My 15 yr old daughter took half for her friends at school and she even gave me a kiss and ”Thanks Mom” to my surprise. My little one could not wait to take them to her class also as she giggles with delight in knowing we did another cool snack together.

 Thank goodness I was able to scrape an extra one out to taste test with my hubby.  Just too bad I had to share!

I suggest the book because she has so many cute ideas but if your strapped for cash google to get some online ideas.

Momma Says: Cake balls are yummy and so much better than a huge slice of cake for the waistline!

Christmas around the world

nativitystory2 Christmas around the worldI just love Christmas the lights and music, Baby Jesus in the manger. In my house he is the reason for the season as for many.  It all makes me thing what I am blessed for..Christmas makes me think of family and how I want to hold traditions close. As I get more involved with my families heritage I want to try foods and all from where my families roots are and I have a few staples in my cook book but I love to find new ones. I found a web site

 http://www.christmas-cookies.com/recipes/bycountry.php  SOO COOL! It breaks down countries and the main Christmas cookies from there! So check that one out and bake up some fun with the kiddos and talk of where your roots are and be proud.

Some Christmas information I found all over some good things here to talk about with kiddos, because Christmas is not just Presents there are reasons the traditions started that we do now. Very interesting stuff.

Did you know that the word Christmas is from an old English term Cristes maesse (Christ’s Mass),even from an older time than that is was, Yule, from the Germanic root geol.  Funny now a days sometimes it turns into the modern X-mas , which I personally do not like . Just find the X somewhat offensive..That’s just me.

Here is some other languages how they say Merry Christmas:

English: Merry Christmas, Yule, Noel
Eskimo: (inupik) Jutdlime pivdluarit ukiortame pivdluaritlo
Polish: Wesolych Swiat Bozego Narodzenia
Croatian: Sretan Bozic
Chinese: (Cantonese) Gun Tso Sun Tan’Gung Haw Sun
Chinese: (Mandarin) Kung His Hsin Nien bing Chu Shen Tan
Czech: Prejeme Vam Vesele Vanoce a stastny Novy Rok
German: Fröhliche Weihnachten
Irish: Nollaig Shona Dhuit, or Nodlaig mhaith chugnat
Lithuanian: Linksmu Kaledu
Swedish: God Jul and (Och) Ett Gott Nytt År
Italian: Buone Feste Natalizie
Spanish: Feliz Navidad
Dutch: Vrolijk Kerstfeest en een Gelukkig Nieuwjaar! or Zalig Kerstfeast
French: Joyeux Noël

Did you know that traditionally Christmas is not a single day but a prolonged period,(Yes I love it) normally from 24th December to 6th January. This included New Years, So to increase values of Christmas. This news supports my theory to make my hubby let me leave my tree up till at least the 6th. He wants it down the day after New Years-Grinch!

christmas layout 51 300x225 Christmas around the worldGiving of Christmas cards is one that we all do. Now with more of the family picture with a postcard saying Merry Christmas or Happy Holidays. The original act of sending Christmas cards with a greeting to family and friends was initiated by Sir Henry Cole in England. The year was 1843 and the first card was designed by J.C.Horsley. He reproduced it for commercial use printing about 1000 copies and he sold them in London.

We cannot forget Christmas gifts, the reasons for sugarplums dancing in the kiddos heads and them watching out to be better for goodness sake or at least the few days prior to the Big Guy’s coming down the chimney!
There are allot of varied roots of where this custom started. There is many stories of St.Nicholas, there is the tradition of Magi giving gifts to baby Jesus, the Roman custom of giving gifts of good luck to children during Saturnalia. There are vary different days of importance when to give gifts depending on culture like the following:

6th December – in memory of St. Nicholas
24th December – Christmas Eve
25th December – Birthday of Jesus
1st of January – the New year
6th of January – The Epiphany, day of the Three Wise men, the Magi

st nicholas1 Christmas around the worldDid you know there was a real St. Nicholas? I got this info from St. Nicholas web site it is a very interesting read so check it out.    http://www.stnicholascenter.org/Brix?pageID=23

The true story of Santa Claus begins with Nicholas, who was born during the third century in the village of Patara. At the time the area was Greek and is now on the southern coast of Turkey. His wealthy parents, who raised him to be a devout Christian, died in an epidemic while Nicholas was still young. Obeying Jesus’ words to “sell what you own and give the money to the poor,” Nicholas used his whole inheritance to assist the needy, the sick, and the suffering. He dedicated his life to serving God and was made Bishop of Myra while still a young man. Bishop Nicholas became known throughout the land for his generosity to the those in need, his love for children, and his concern for sailors and ships.

Of course we cannot froget the elves who helped Santa. This started more in Northern Europe with Father Christmas needing help.  But, it is mostly by the Scandinavian tradition. Where they believed in a number of gnomes
These tales of gnomes can be traced back as far as pagan times, when they pretty much everyone believed in house roaming gnome Christmas around the worldgnomes who would guard the homes against any evil. They knew gnomes as mostly benevolent creatures but they has a terrible streak if they felt they were not treated nice. They wore grey clothing with red caps. The idolization of gnomes still stayed even with Christianity taking over Europe. Many of the tales and traditions told of gnomes were fixed in writing in 19th century with some artists they eventually created the Christmas gnomes who we today know as Santa’s Elves.

Some elves like in Finland are not as well with the kiddos because they are scared by “tontut” who watch through the windows to see if they are on their best behaviour the year round. I remember when my daughter first realized that Santa was “watching” her she said Momma that is creepy, I had to laugh cause yea kinda creepy if you think of it. But hey if it keeps the little ones in line for at least Christmas week, that is hopefully one holiday stress parents everywhere wont have to deal with.

Momma says: Thanks John Lennon for this one:
And So This Is Christmas;
And What Have We Done?
Another Year Over;
A New One Just Begun;
And So Happy Christmas;
I Hope You Have Fun;
The Near And The Dear Ones;
The Old And The Young.

Recipe: Tasty Turkey

Herb Roasted Turkey with Apple Cider Gravy 258x300 Recipe: Tasty Turkey Ok you have the big bird ready to go. First off get the bag of fun innards out of the inside of the bird. It is stuffed in there somewhere so look for it. I cannot tell you how many people first attempts at cooking a Thanksgiving bird left it in. I admit I did it my first time cooking Thanksgiving. Oh yea and the lovely neck bone that is another fun one that is in there too. Maybe you have attempted it before with decent results but nothing over the top. Well if you want to truly infuse the turkey meat with flavor you cannot just stuff the bird with lemons and things you need to get it under the skin of that bird!  First of course you rinse and pat dry the turkey inside and out then your ready. Choose some fresh ingredients like lemon zest, (use a micro plane for best results) salt and pepper add thyme, rosemary and sage chop it all up then blend with some oil (or butter) to make it a nice paste. Using your hand go underneath the skin and loosen it from the meat, try not to make any holes in the skin. Even pull it up around the thigh and leg. Now get that nice paste up in there. I know it is so gross, I sometimes need to have an out of body experience when doing the bird.  After you have it all under the skin save some to rub in the cavity of the bird and any more rub into the skin. If none left just oil and salt and pepper on the skin is enough. Throw the rest of the lemon and some onion roughly chopped with whatever veg on hand you have to help the flavor. Just bend back wings and I do not truss I just cover the wings and legs later with foil if needed if they brown too much near the end. I bake it at 350 and keep rotating the bird when I baste it this is the best way to roast that bird so it evenly gets heated and browned. Start with the bird with the breast side down. Why you ask? Well you want to roast it upside down at first to get all those juices in the breast meat nice so it will be nice mr bean cooking turkey Recipe: Tasty Turkey and moist and flavorful. Also use a rack to put the bird on, line the rack with some layers of aluminum foil with some holes punched into it and sprayed with cooking spray. This will help insure that the rack does not make the breast meat look like it has grid lines in it from cooking, not pretty!  We want this turkey just as good as it can look and taste. I cook that bird upside down for 30 minutes. Then baste and turn the whole pan around so the side that was in the back of the oven will now be in the front. this does a good job to help insure more even heating, also dark meat takes longer to cook to the right internal temperature so having it upside down helps it cook .  Cook another 30 minutes with it turned around and baste once more. Do this twice so each side gets a little back and forth action and basting. Now flip that birdie breast side up baste and cook 30 min basting every 15 min. Now once again you want to turn the tray around so the back of the oven side is now in the front and continue to baste every 15 min and cook until the desired color is achieved and internal temperature is reached. Take out of the oven and let her rest 20 min to make sure the juices stay nice inside the meat. Thigh should read 170 deep inside it and breast 165, this is a must be step to make sure it is properly cooked.

As a side note I do not stuff my turkey with bread stuffing, I find it risky and the thought makes my stomach upset and just typing and thinking of it I want to hurl.

20830c6bb12b3c00 turkey thermometer 258x300 Recipe: Tasty Turkey To brine or not to brine that is the question. I have never brined a turkey. Though some say it helps with flavor and moistness. I have not needed to brine yet but if you want go for it. I love Alton Brown from the food network and he does it, so if I buy a bird fresh someday that needs it I will head his advice cause he is AWESOME! If you buy a kosher bird you wont have to brine it, also some frozen birds are already infused with a salt solution so that way you can avoid that brining step altogether. BONUS!!!
Good luck and have a Happy Thanksgiving!

Momma says: Eat and blissfully go chill on the tryptophan filled belly of yours.

The following is guidelines by the USDA on how to safely cook a turkey and timing
Let’s Talk Turkey—A Consumer Guide to Safely Roasting a Turkey
Fresh or Frozen?

Fresh Turkeys
Allow 1 pound of turkey per person.
Buy your turkey only 1 to 2 days before you plan to cook it.
Keep it stored in the refrigerator until you’re ready to cook it. Place it on a tray or in a pan to catch any juices that may leak.
Do not buy fresh pre-stuffed turkeys. If not handled properly, any harmful bacteria that may be in the stuffing can multiply very quickly.

Frozen Turkeys
Allow 1 pound of turkey per person.
Keep frozen until you’re ready to thaw it.
Turkeys can be kept frozen in the freezer indefinitely; however, cook within 1 year for best quality.
See “Thawing Your Turkey” for thawing instructions.

Frozen Pre-Stuffed Turkeys

USDA recommends only buying frozen pre-stuffed turkeys that display the USDA or State mark of inspection on the packaging. These turkeys are safe because they have been processed under controlled conditions.

DO NOT THAW before cooking. Cook from the frozen state. Follow package directions for proper handling and cooking.

Allow 1¼ pounds of turkey per person.

Thawing Your Turkey

There are three ways to thaw your turkey safely — in the refrigerator, in cold water, or in the microwave oven.

In the Refrigerator (40 °F or below)
Allow approximately 24 hours for every 4 to 5 pounds
4 to 12 pounds 1 to 3 days
12 to 16 pounds 3 to 4 days
16 to 20 pounds 4 to 5 days
20 to 24 pounds 5 to 6 days

Keep the turkey in its original wrapper. Place it on a tray or in a pan to catch any juices that may leak. A thawed turkey can remain in the refrigerator for 1 to 2 days. If necessary, a turkey that has been properly thawed in the refrigerator may be refrozen.

In Cold Water
Allow approximately 30 minutes per pound
4 to 12 pounds 2 to 6 hours
12 to 16 pounds 6 to 8 hours
16 to 20 pounds 8 to 10 hours
20 to 24 pounds 10 to 12 hours

Wrap your turkey securely, making sure the water is not able to leak through the wrapping. Submerge your wrapped turkey in cold tap water. Change the water every 30 minutes. Cook the turkey immediately after it is thawed. Do not refreeze.
In the Microwave Oven

Check your owner’s manual for the size turkey that will fit in your microwave oven, the minutes per pound, and power level to use for thawing.
Remove all outside wrapping.
Place on a microwave-safe dish to catch any juices that may leak.
Cook your turkey immediately. Do not refreeze or refrigerate your turkey after thawing in the microwave oven.

REMINDER: Remove the giblets from the turkey cavities after thawing. Cook separately.

Roasting Your Turkey

Set your oven temperature no lower than 325 °F.

Place your turkey or turkey breast on a rack in a shallow roasting pan.

For optimum safety, stuffing a turkey is not recommended. For more even cooking, it is recommended you cook your stuffing outside the bird in a casserole. Use a food thermometer to check the internal temperature of the stuffing. The stuffing must reach a safe minimum internal temperature of 165 °F.

If you choose to stuff your turkey, the ingredients can be prepared ahead of time; however, keep wet and dry ingredients separate. Chill all of the wet ingredients (butter/margarine, cooked celery and onions, broth, etc.). Mix wet and dry ingredients just before filling the turkey cavities. Fill the cavities loosely. Cook the turkey immediately. Use a food thermometer to make sure the center of the stuffing reaches a safe minimum internal temperature of 165 °F.

A whole turkey is safe when cooked to a minimum internal temperature of 165 °F as measured with a food thermometer. Check the internal temperature in the innermost part of the thigh and wing and the thickest part of the breast. For reasons of personal preference, consumers may choose to cook turkey to higher temperatures.

If your turkey has a “pop-up” temperature indicator, it is recommended that you also check the internal temperature of the turkey in the innermost part of the thigh and wing and the thickest part of the breast with a food thermometer. The minimum internal temperature should reach 165 °F for safety.

For quality, let the turkey stand for 20 minutes before carving to allow juices to set. The turkey will carve more easily.

Remove all stuffing from the turkey cavities.

Timetables for Turkey Roasting
(325 °F oven temperature)

Use the timetables below to determine how long to cook your turkey. These times are approximate. Always use a food thermometer to check the internal temperature of your turkey and stuffing.

Unstuffed
4 to 8 pounds (breast) 1½ to 3¼ hours
8 to 12 pounds 2¾ to 3 hours
12 to 14 pounds 3 to 3¾ hours
14 to 18 pounds 3¾ to 4¼ hours
18 to 20 pounds 4¼ to 4½ hours
20 to 24 pounds 4½ to 5 hours

Stuffed
4 to 6 pounds (breast) Not usually applicable
6 to 8 pounds (breast) 2½ to 3½ hours
8 to 12 pounds 3 to 3½ hours
12 to 14 pounds 3½ to 4 hours
14 to 18 pounds 4 to 4¼ hours
18 to 20 pounds 4¼ to 4¾ hours
20 to 24 pounds 4¾ to 5¼ hours

It is safe to cook a turkey from the frozen state. The cooking time will take at least 50 percent longer than recommended for a fully thawed turkey. Remember to remove the giblet packages during the cooking time. Remove carefully with tongs or a fork.

REMEMBER! Always wash hands, utensils, the sink, and anything else that comes in contact with raw turkey and its juices with soap and water.

For information on other methods for cooking a turkey, call the USDA Meat and Poultry Hotline
1-888-MPHotline 1-888-MPHotline ( 1-888-674-6854 1-888-674-6854 )
TTY: 1-800-256-7072 1-800-256-7072
www.fsis.usda.gov

Storing Your Leftovers

Discard any turkey, stuffing, and gravy left out at room temperature longer than 2 hours; 1 hour in temperatures above 90 °F.
Divide leftovers into smaller portions. Refrigerate or freeze in covered shallow containers for quicker cooling.
Use refrigerated turkey and stuffing within 3 to 4 days. Use gravy within 1 to 2 days.
If freezing leftovers, use within 2 to 6 months for best quality.

Reheating Your Turkey

Cooked turkey may be eaten cold or reheated.

In the Oven
Set the oven temperature no lower than 325 °F.
Reheat turkey to an internal temperature of 165 °F. Use a food thermometer to check the internal temperature.
To keep the turkey moist, add a little broth or water and cover.

In the Microwave Oven
Cover your food and rotate it for even heating. Allow standing time.
Check the internal temperature of your food with a food thermometer to make sure it reaches 165 °F.
Consult your microwave oven owner’s manual for recommended times and power levels.

For more information about food safety (in English and Spanish), call:
USDA Meat and Poultry Hotline
1-888-MPHotline 1-888-MPHotline
( 1-888-674-6854 1-888-674-6854 )
TTY: 1-800-256-7072 1-800-256-7072
10:00 a.m. to 4:00 p.m. Eastern time, Monday through Friday
E-mail: [email protected]
Or “Ask Karen,” FSIS’ Web-based automated response system – available 24/7 at www.fsis.usda.gov.

Recipe: Autumn Pear Pie

pears 150x150 Recipe: Autumn Pear PieFall is here and the grocery is having huge sale on pears. I love pears especially super juicy and sweet ones like Anjou, I also love Asian pears.
They are the perfect snack next to the popular apples.
Some pear facts :The pear is all natural, quick little pick me up of energy, due mostly to its high amounts of two (big word of the day here) monosaccharides: fructose and glucose or should I just plainly say simple sugar. It also has Levulose, the sweetest of known natural sugars, found to be mostly in fresh pears than any other fruit. Know wonder why I just cant get enough of it when that juicy pear is just running down my hand as I take a bite! A pear is perfect nutrient dense food, providing more nutrients per calorie, than calories per nutrient. Carbohydrates make up 98% of the energy provided by a pear, and these right kind of carbohydrates are helpful in weight reduction diets because they contain half as many calories as fat, wow now you know.  icon smile Recipe: Autumn Pear Pie

481 Recipe: Autumn Pear PieSo I had some pears that got and needed to make something so I thought I would make a pie, fudging the recipe I use for apple pie. Crossing my fingers and hoping for the best. Well it came out SUPER YUMMY! My hubby said he liked it more than the apple pies, I must admit I liked it too and there was just a sliver left after giving my Dad a piece to take home for late night snack that I had some with coffee in the morning and it was even better the next day. Hope you enjoy.

Preheat oven 400
5 Cups either Anjou or Bartlett peeled, cored and cut 1/4 inch thick (7 med pears aprox)
1/2 C Brown sugar
1/4 C flour
1/2 C quick cooking oats
1 tsp Cinnamon
1/2+ C unsweetened frozen apple cherry juice concentrate (by Old Orchard,thawed)
2 Tbl salted butter chopped up to dot with
2 pie crusts

Mix cut pears, sugar, flour, oats and cinnamon in a bowl.
pour a little over 1/2 c of thawed juice concentrate into pear mix.
place into pie shell. Dot with the butter all over.
put top pie crust on with hole or slits to vent and flute edge.
brush with egg white and water mix
bake on baking sheet after 10-15 min place either parchment with circle cut from center over pie or use foil to cover crust edge to protect from over browning
reduce heat to 350 continue to bake for another 35-40 min
cool on rack and dig in – I like it still warm from oven!

Momma Says:  Show the family love with a nice warm freshly baked pie. Maybe then hubby will help with dinner dishes.

Best Pumpkin Seed Recipe

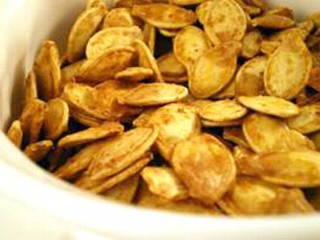
Ok it took much trial and error to fineally hear from someone to try boiling the seeds first, DUH why did I never think of that before? 

pa144155 300x224 Best Pumpkin Seed RecipeSo with the addition of boiling my pumkin seeds are now so much more yummy.  I like to experiment with flavors. Try pumpkin pie spice or just plain sugar and cinnamon for a yummy sweet treat, even try boiling with some lime juice and when baking add chili powder for a spicy seed!  The possibilities are endless. 

Below is my tried and true method for Best Pumpkin Seeds EVER!  Enjoy!!

Pumpkin carved with seeds removed and washed (use colonder watch out these seeds are slippery little stinkers)

1 TBl. Salt

1 TBl Olive Oil

2 c Water (add lime juice  if using chili spice)

1 tsp to 1TBl. Spices to your liking

Preheat oven to 400 degrees

in small sauce pan add 2 C water for every 1/2 cup seeds add 1 Tbl salt  (more salt if you like it seeds saltier) and boil

Simmer seeds for 10 minutes

drain

Toss 1 TBL Olive oil  and seeds put in roasting pan, in a pinch I have used Pam spray

sprinkle with spice if desired (no need to add any extra salt)

Spread out seeds and bake on top rack

10- 20 minutes

let cool and eat

Momma Says: Turn Jack’s slimy guts into salty, crunchy ooohh so yummy snack.