


Homemade Pita Bread Recipe | The Recipe Critic
[ad_1]
This website may contain affiliate links and advertising so that we can provide recipes to you. Read my privacy policy.
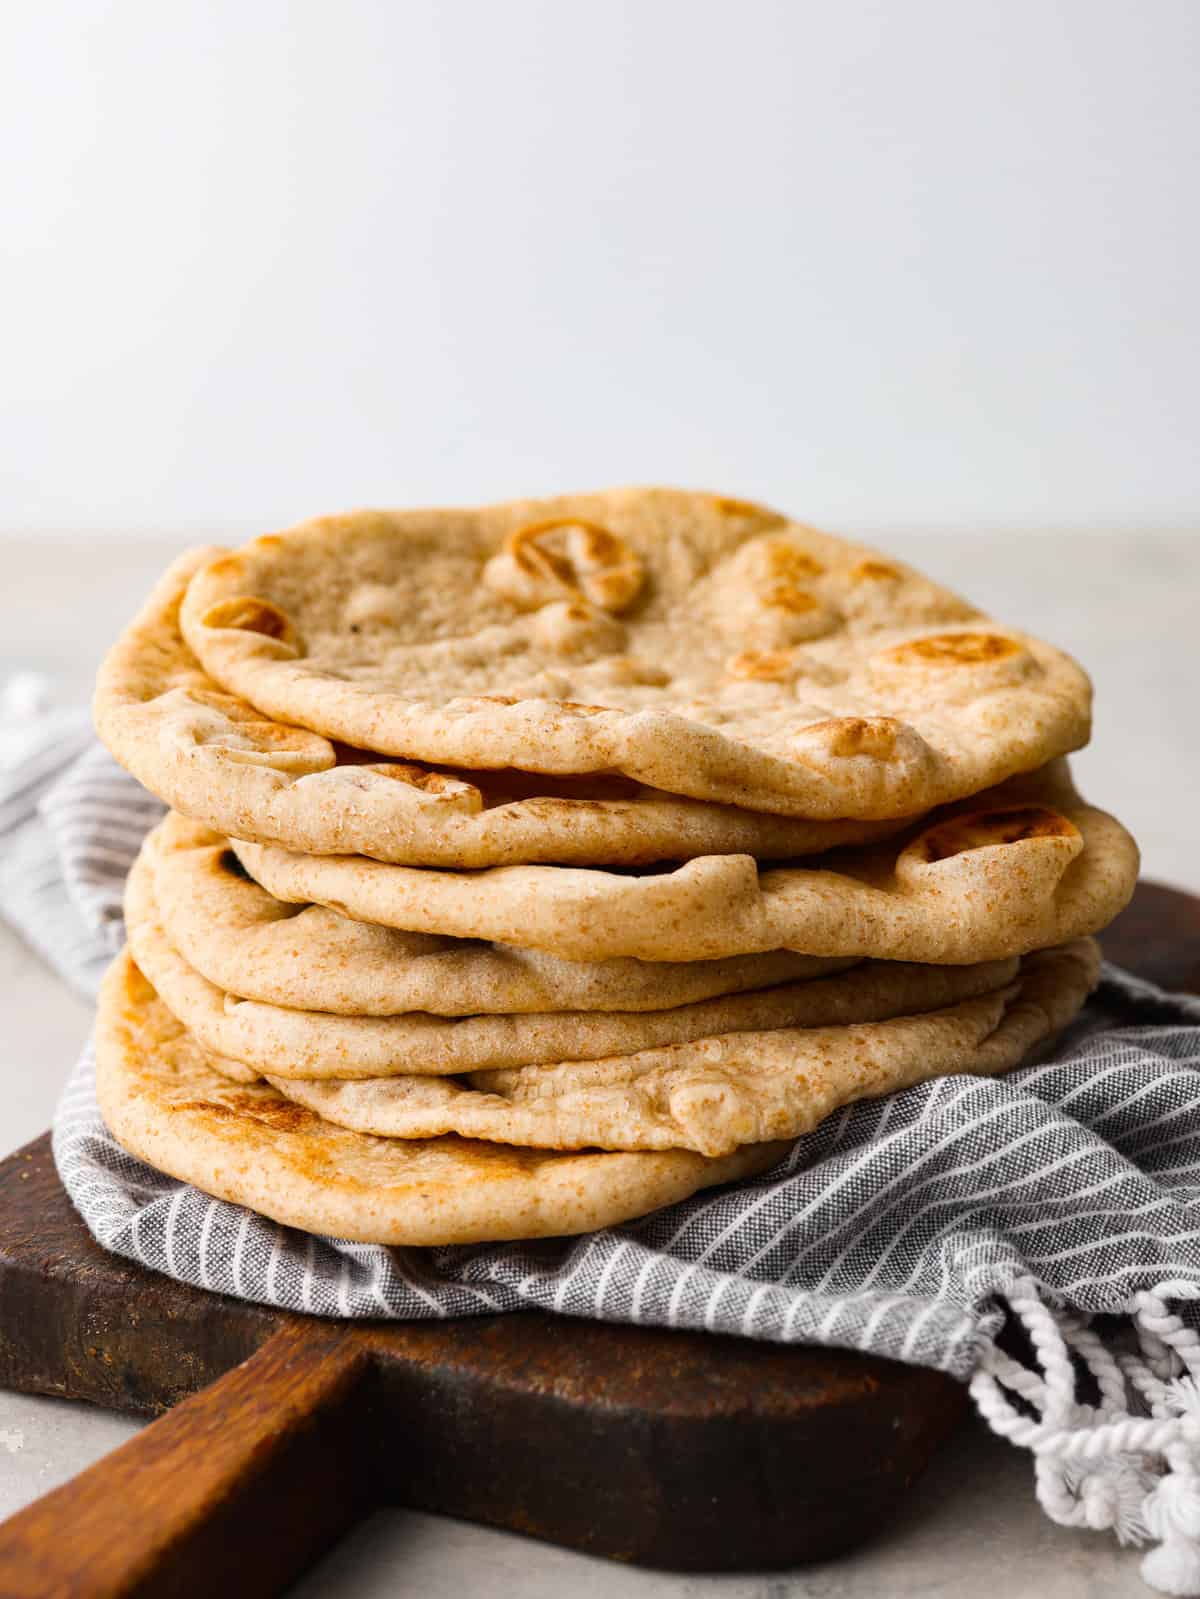
This homemade pita bread is soft, fluffy, and full of authentic flavor! Yes, you can buy pita bread at the store, but a freshly baked pita tastes so much better and will make your home smell absolutely delicious. Everyone will want to know what you are making!
I think everyone who has tried homemade bread can agree that it tastes way better than store-bought, and this pita bread is no exception! I’ve been really enjoying making bread from home, and if you are a bread lover like me, you’ll love this Apple Bread, my Grandma’s Perfect Homemade Bread, and this delicious Strawberry Banana Bread. I love the feeling of kneading dough and watching it turn into a delicious treat. If you have never made bread before, this pita bread is a great recipe to start with.
What is Pita Bread?
Pita bread is a classic Greek flatbread that is soft, chewy, and has a hole in the inside that you can fill with delicious fillings! Some people get pita bread mixed up with Naan, but they are different in many ways. While naan is usually made with egg and yogurt, pita bread does not. That means it is vegan-friendly and is a light, fluffy bread.
Pita bread is delicious with many different dishes and can be a side or stuffed with fillings to create a meal of its own. A very traditional way to eat it that you may have seen at your local fair is a Gyro, a delicious Greek-style taco that is full of flavor! You could also eat pita bread with Chicken Souvlaki and any soup or stew. You could also make them into pita chips and eat them with hummus. Pita bread is so versatile and full of flavor you won’t regret learning how to make it at home!
Pita Bread Ingredients
The ingredients in this pita bread are shockingly simple. Just six ingredients make an incredible and delicious bread. The best part is, that you likely already have all of these things in your pantry, so there is no need to run to the store!
Lukewarm Water: The warmer temperature helps to activate the yeast, which you need in order to get the puffy hollow pocket to your bread.Active Dry Yeast: Yeast is what helps the bread rise, making it fluffy and soft.Granulated Sugar: Sugar helps the yeast activate and gives the bread a sweeter flavor.Whole Wheat Flour Divided: It is traditional to have whole wheat flour in pita bread. Divided means you take whatever amount the recipe tells you (in this case, ¼ cup) and cut it in half. It is helpful to have two bowls to keep them in so that you don’t forget to divide them!All-Purpose Flour Divided: You could also use unbleached or baking flour, just use whatever you have on hand.Salt: Salt enhances the flavor of the pita bread.Olive Oil: It is traditional to put olive oil in this bread, but you could substitute it with vegetable oil, melted butter, or melted shortening.
How to Make Pita Bread
It’s easier than you think to make pita bread from scratch! You don’t have to be a bread maker, this could even be your first time making bread, and I promise they will turn out great! Following my instructions and tips, your house will smell like a genuine Greek bakery, and you’ll be amazed by the soft and fluffy bread you can create!
Make the Dough
Combine to Make Yeast Mixture: Add the water, yeast, and sugar to the bowl of a mixer and whisk until the yeast and sugar are dissolved. Stir in ¼ cup wheat flour and ¼ cup of all-purpose flour. Once combined, cover and set in a warm spot for 15 minutes or so. The mixture should become nice and bubbly, which is your sponge.Stir: Stir in the remaining whole wheat flour, one ¼ cup of all-purpose flour (leaving ½ cup for dusting), salt, and olive oil. Mix until a shaggy dough forms. Dust lightly with flour and use the dough hook to knead in the bowl for 1-2 minutes on low speed.Knead and Let the Dough Rise: Dust a clean surface with a little flour and transfer the dough. Knead by hand for a few minutes until it becomes smooth. It should still be a little tacky, so be careful not to knead too much flour into it. Place in an oiled bowl and turn the dough to ensure it’s covered with the oil. Cover the bowl with plastic wrap or a clean kitchen towel. Set aside to rise until the pita bread dough has doubled in size, about an hour.
Divide and Cook
Punch Dough and Form Balls: Punch down the dough and turn it out onto a floured surface. Divide it into eight equal portions and form them into balls. Cover and let the dough balls rest for 10-15 minutes.Flatten Dough: Use a rolling pin to roll the balls out on a lightly floured surface until they are about 8-inches in diameter and roughly ¼ inch thick. Then, set them aside until ready to cook.Cook: Heat a large skillet over medium heat. Add a teaspoon or two of olive oil and use a clean kitchen towel or a paper towel to wipe the oil around the inside of the pan and soak up any excess oil. Place one rolled pita dough into the pan and cover with a lid for 30 seconds. Flip the pita over, cover, and cook for an additional 1.5-2 minutes. Fli, cover, and cook once more for about 1 minute.Cover: Remove the cooked pita to a clean kitchen towel and cover while you cook the remaining pita bread.
Do I Need a Stand Mixer to Make Pita Bread?
No! I used one because I have one, but I often will make this recipe by hand. Listed below is all you really need to make this delicious pita bread:
Large Mixing BowlSomething to stir the dough (I prefer a wooden spoon)Whisk Rolling Pin
Tips for Making Pita Bread
Whole wheat flour is traditionally used when making pita bread. If you would like to make this recipe with all white flour, here is how
Make it Gluten-Free: You can make this recipe gluten-free by substituting all of the flour for gluten-free flour. You can find many great gluten-free blends at the grocery store!Roll the Dough Evenly: Rolling the dough out evenly is really important to create a nice puff when cooking. If the dough is thicker in some areas, it may stay flatter. You want to make sure to roll it out as thin as you can to create a nice pocket inside when cooking.Keep the Dough Soft: Directly after removing them from the skillet, you will want to wrap the dough in a tea towel loosely. The tea towel will help to keep them warm and soft, as well as allow the steam to travel through the towel, keeping them from getting soggy.
Storing Homemade Pita Bread
You can easily make this bread ahead of time and enjoy it for days stored at room temperature. Extend the shelf life by placing this bread in the fridge or freezer!
Storing Leftover Bread: Place your cooled pita bread in an airtight plastic bag in the fridge for up to a week.Freezing Pita Bread: Place your cooled pita bread in an airtight plastic bag in the freezer for up to 3 months. I recommend laying down a piece of parchment paper between pitas and squeezing out all of the air before sealing.Storing Leftover Dough: If you don’t want to cook all of the dough right away, you can store the dough in the fridge for up to a week. Wrap the dough in plastic wrap so that it doesn’t dry out!
Make It a Meal!Now that you have this soft and fluffy pita bread on hand, you’ll want to make an entire meal to go with it! Here are my suggestions for a fun and easy Greek inspired dinner!
Add the water, yeast, and sugar to the bowl of a mixer and whisk until the yeast and sugar are dissolved. Stir in ¼ cup wheat flour and ¼ cup of all-purpose flour. Once combined, cover and set in a warm spot for 15 minutes or so. The mixture should become nice and bubbly, which is your sponge.Stir in the remaining whole wheat flour, one ¼ cup of all-purpose flour (leaving ½ cup for dusting),salt, and olive oil. Mix until a shaggy dough forms. Dust lightly with flour and use the dough hook to knead in the bowl for 1-2 minutes on low speed. Dust a clean surface with a little flour and transfer the dough. Knead by hand for a few minutes until it becomes smooth. It should still be a little tacky, so be careful not to knead too much flour into it. Place in an oiled bowl and turn the dough to ensure it’s covered with the oil. Cover the bowl with plastic wrap or a clean kitchen towel and set aside to rise until doubled in size, about an hour.Punch down the dough and turn it out onto a floured surface. Divide it into eight equal portions and form them into balls. Cover and let the dough balls rest for 10-15 minutes.Use a rolling pin to roll the balls out on a lightly floured surface until they are about 8-inches in diameter and roughly ¼ inch thick, and set aside until ready to cook.Heat a large skillet over medium heat. Add a teaspoon or two of olive oil and use a clean kitchen towel or a paper towel to wipe the oil around the inside of the pan and soak up any excess oil. Place one rolled pita dough into the pan and cover with a lid for 30 seconds. Flip the pita over, cover, and cook for an additional 1.5-2 minutes. Fli, cover, and cook once more for about 1 minute.Remove the cooked pita to a clean kitchen towel and cover while you cook the remaining pitas.
Serves: 8
Calories181kcal (9%)Carbohydrates31g (10%)Protein5g (10%)Fat4g (6%)Saturated Fat1g (5%)Polyunsaturated Fat1gMonounsaturated Fat3gSodium295mg (12%)Potassium89mg (3%)Fiber2g (8%)Sugar0.4gVitamin A1IUVitamin C0.01mgCalcium9mg (1%)Iron2mg (11%)
All nutritional information is based on third party calculations and is only an estimate. Each recipe and nutritional value will vary depending on the brands you use, measuring methods and portion sizes per household.
Course BreadCuisine MediterraneanKeyword pita bread
[ad_2]
Source link